Blog
A random collection of thoughts on a variety of topics
“Network Socket Programming with Dart 1.0”
2013-11-20
It’s hard to believe that I started writing about Google Dart a year ago this November, and almost like clock work Dart SDK 1.0 was released on November 14th. With the release of version 1.0 comes a full web development environment that rivals what is currently available with Javascript. While the client side web stuff is super cool and powerful, I love that it has server side utilities as well. It’s kinda like using Javascript in the browser and Node.js on the server. Dart is a complete package!
To kick off the release of version 1.0 I’m going to run a series on Dart. I am not sure where it will go, but my goal is to cover classes and topics not really covered by other sites. For this installment I am going to cover socket programming in Dart on the server side.
To prevent another fiasco I will disclose that I am using the Dart VM 1.0.0.3_r30188 on 64 bit Ubuntu Linux. All of the below code was written for and tested against that version. If you have any issues check your version first, then leave me a comment below. Let’s dive in!
What is a network socket?
In the broad sense, a socket is an endpoint to an interprocess communications connection across a network. They are usually implemented in the transport layer of the OSI model. For this exercise you can simply think of them as an interface to get your program sending and receiving data across a network, or over the Internet. Dart socket objects are implemented on TCP/IP. Dart does not support UDP at the moment Edit: UDP is now supported and covered on this page. Other types of sockets exist, such as Unix domain sockets and websockets, but those won’t be covered here.
In this article we are concerned with two classes from the dart:io API. the first is Socket which we can use to establish a connection to a server as a client. The second is ServerSocket which we will use to create a server, and accept client connections.
Client connections
The Socket class has a static method called Connect(host, int port). The host parameter can be either a String with a host name or IP address, or an InternetAddress object. Connect will return a Future<Socket> object that will make the connection asynchronously. To know when a connection is actually made, we will register a Future.then(void onValue(T value)) callback. Lets take a look.
/*
   file: socketexample.dart
   Author: James Slocum
*/

import 'dart:io';

void main() {
  Socket.connect("google.com", 80).then((socket) {
    print('Connected to: '
      '${socket.remoteAddress.address}:${socket.remotePort}');
    socket.destroy();
  });
}
In the above example we opened a connection to google.com on port 80. Port 80 is the port that serves web pages. After the socket is connected to the server, the IP and port that it is connected to are printed to the screen and the socket is shutdown. By shutting down the socket using Socket.destroy() we are telling dart that we don’t want to send or receive any more data on that connection. When you run this program (assuming you have a connection to the internet and DNS is working properly) you should see a similar output to the one below.
$ dart socketexample.dart
Connected to: 173.194.43.36:80
You see, nothing too it! Dart does all of the heavy lifting of looking up the IP for google.com, and establishing the connection over TCP. All your code has to do is sit back and wait. Lets take it a step further. Lets request the index page from google after we have connected. In order to accomplish this we must do two things. First we have to send a request for the page, and second we must have a way of receiving the response. In order to send data over a socket we have to use the Socket.write(String data) method. To receive data we have to register an onData() callback using the Socket.listen(void onData(data)) method. For this example we will also register an optional onDone() callback to let us know when the server has closed the connection.
/*
  file: getindexexample.dart
  author: James Slocum
*/
import 'dart:io';

void main() {

  String indexRequest = 'GET / HTTP/1.1\nConnection: close\n\n';

  //connect to google port 80
  Socket.connect("google.com", 80).then((socket) {
    print('Connected to: '
      '${socket.remoteAddress.address}:${socket.remotePort}');

    //Establish the onData, and onDone callbacks
    socket.listen((data) {
      print(new String.fromCharCodes(data).trim());
    },
    onDone: () {
      print("Done");
      socket.destroy();
    });

    //Send the request
    socket.write(indexRequest);
  });
}
Note: This program is just to illustrate the use of Sockets and how they work. I would not advocate connecting to an HTTP server using raw TCP sockets. Dart offers an HttpClient class that provides much more functionality.
When you run the above code, you should see the HTTP/1.1 response headers followed by the contents of the index page. This little application can be a great tool for learning about web protocols. You can also see exactly what cookies are being set, and their values.
$ dart getindexexample.dart
Connected to: 173.194.43.38:80
HTTP/1.1 200 OK
Date: Tue, 19 Nov 2013 02:05:33 GMT
Expires: -1
Cache-Control: private, max-age=0
Content-Type: text/html; charset=ISO-8859-1
...
...
(headers and HTML code)
...
</script></body></html>
Done
Server Sockets
As you can see, making remote connections to a server is easy when you use the Dart Socket object. So what do you do if you want remote clients to connect to you? For that we can use the ServerSocket object. In order to create a server that can handle client connections, we must first bind to a specific TCP port that we will listen on. To do this we can use the static ServerSocket.bind(address, int port) method. This will return a Future<ServerSocket>. Once again we will use the Future.then(void onValue(T value)) method to register our callback so we know when the socket has been bound to the port. Make sure to choose a port higher then 1024. Ports lower then that are in the reserved range and may require root or administrator permissions to bind. In my examples I use port 4567.
/**
  file: serverexample.dart
  author: James Slocum

  Simple server that will
     1) accept a new connection
     2) say hello
     3) close the connection
*/

import 'dart:io';

void main() {
  ServerSocket.bind(InternetAddress.ANY_IP_V4, 4567).then(
    (ServerSocket server) {
      server.listen(handleClient);
    }
  );
}

void handleClient(Socket client){
  print('Connection from '
    '${client.remoteAddress.address}:${client.remotePort}');

  client.write("Hello from simple server!\n");
  client.close();
}
You should notice a big difference from last time. Instead of listening for binary data from our connection, we are listening for client connections. When we get a connection, it calls our handleClient(Socket client) function with a Socket object that represents the client connection. Going forward we will use this client socket object to send data to, and receive data from this specific client. To run this example we need to use two terminals. In the first on you can run the server, and in the second you can use telnet as the client application.
#First terminal
$ dart serverexample.dart
Connection from 127.0.0.1:47347  #After we run telnet in another terminal

#Second terminal
$ telnet localhost 4567
Trying 127.0.0.1...
Connected to localhost.
Escape character is '^]'.
Hello from simple server!
Connection closed by foreign host.
I also want to point out the use of InternetAddress.ANY_IP_V4 which tells the ServerSocket that it’s free to accept connections on any device that supports IPv4. In my case that is my ethernet card, my wireless card, and my loopback device (localhost). If you want to bind to a specific ethernet device, you can use a string with the IP address of that device and it will be the only one that can receive connections for the specified port.
You will notice when you run the above server example that it does not exit after it closes the client connection. In fact it will keep accepting new clients, sending them the hello string, and closing the connection. That is because of Darts asyncronous io model. The nice part about this is that we don’t have to spawn any threads or explicitly tell the server socket to start listening for another connection. It does this all on its own!
Simple chat room server project
Now that we got our feet wet with some sample programs, it’s time to step it up and write some cool code. Lets write a simple chat room server. The server will accept connections from clients and add them to the room. When a client sends a message to the room, all other connected clients will receive it. It should also gracefully handle errors and disconnections.
We can build off of our serverexample.dart program. The first problem to tackle is how to know which client is sending a message. When a callback is called, there is no way to know which socket called it. To get around this issue we will make a ChatClient class that will wrap the client socket object and provide the callback functions.
...
...

class ChatClient {
  Socket _socket;
  String _address;
  int _port;

  ChatClient(Socket s){
    _socket = s;
    _address = _socket.remoteAddress.address;
    _port = _socket.remotePort;

    _socket.listen(messageHandler,
        onError: errorHandler,
        onDone: finishedHandler);
  }

  void messageHandler(List data){
    String message = new String.fromCharCodes(data).trim();
    distributeMessage(this, '${_address}:${_port} Message: $message');
  }

  void errorHandler(error){
    print('${_address}:${_port} Error: $error');
    removeClient(this);
    _socket.close();
  }

  void finishedHandler() {
    print('${_address}:${_port} Disconnected');
    removeClient(this);
    _socket.close();
  }

  void write(String message){
    _socket.write(message);
  }
}

...
...
This class is simple but necessary. The constructor takes in a Socket object which it will hold internally. It also provides the onData(), onError() and onDone() callback functions that will be used by the socket. The messageHandler() function will read a message from the client and distribute it to the other clients. Lets take a look at the distributeMessage(ChatClient client, String message) function to see how it works.
...
List<ChatClient> clients = [];

void distributeMessage(ChatClient client, String message){
  for (ChatClient c in clients) {
    if (c != client){
      c.write(message + "\n");
    }
  }
}
...
The distributeMesssage() function will iterate though the list of connected clients and forward the received message to them all. The clients list acts as our chat room. When a client connects they are added to the room by the handleConnection(Socket client) function which is registered as a callback to the server socket.
ServerSocket server;

void main() {
  ServerSocket.bind(InternetAddress.ANY_IP_V4, 4567)
    .then((ServerSocket socket) {
       server = socket;
       server.listen((client) {
         handleConnection(client);
       });
    });
}

void handleConnection(Socket client){
  print('Connection from '
    '${client.remoteAddress.address}:${client.remotePort}');

  clients.add(new ChatClient(client));

  client.write("Welcome to dart-chat! "
    "There are ${clients.length - 1} other clients\n");
}
Finally when a client disconnects from the chat server, the ChatClient object will remove itself from the client list by calling removeClient(ChatClient client). After it has removed itself from the room it closes the socket.
void removeClient(ChatClient client){
  clients.remove(client);
}
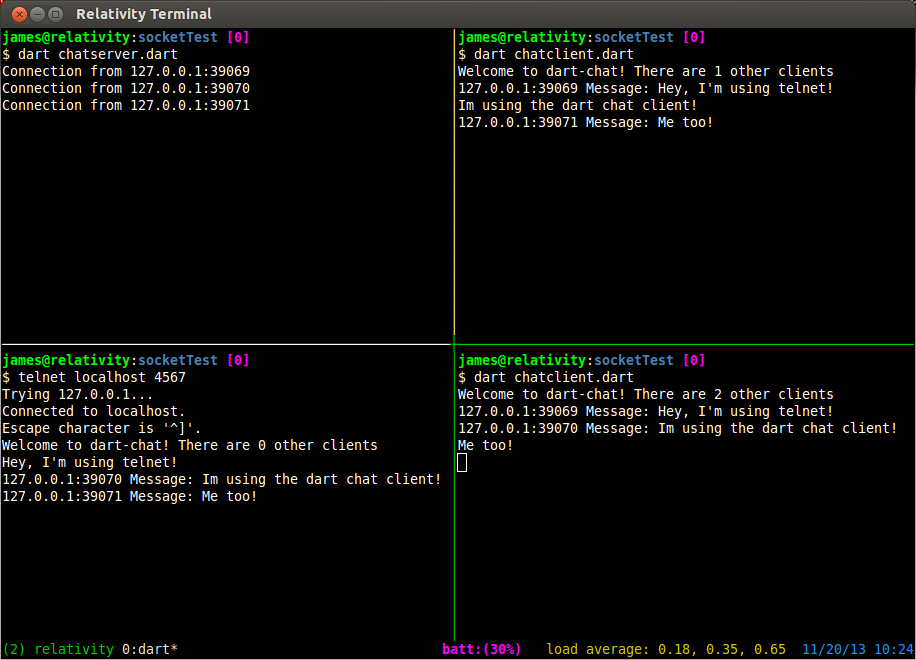
You can download the full chat server source code here. To run it simply extract the files and run
$ dart chatserver.dart
To test it out can you use telnet again.
$ telnet localhost 4567
Chat room client
To wrap up this installment let’s implement our own chat room client instead of having to rely on other programs. The client is much simpler then the server. It simply needs to connect to the server, have a way to receive messages, and a way to read messages from the user and send them to the server. As we saw in previous examples, connecting to the server and sending it a message is a snap, so the only new part is reading from the user. To do this we can use the Stdin class. dart:io has a global instance of Stdin open called stdin, so all we need to do is register the onData() call back with it.
import 'dart:io';

Socket socket;

void main() {
  Socket.connect("localhost", 4567)
    .then((Socket sock) {
      socket = sock;
      socket.listen(dataHandler,
        onError: errorHandler,
        onDone: doneHandler,
        cancelOnError: false);
    })
    .catchError((AsyncError e) {
      print("Unable to connect: $e");
      exit(1);
    });

  //Connect standard in to the socket
  stdin.listen((data) =>
      socket.write(
        new String.fromCharCodes(data).trim() + '\n'));
}

void dataHandler(data){
  print(new String.fromCharCodes(data).trim());
}

void errorHandler(error, StackTrace trace){
  print(error);
}

void doneHandler(){
  socket.destroy();
  exit(0);
}
To use this client simply run the command
$ dart chatclient.dart
after you have started the server.
Try running multiple instances of the client and typing in each of them. You will see the messages getting passed around to the other clients. What’s nice is that it doesn’t matter if the clients are using telnet or the custom chatclient.dart program because of the simple text based nature of the server. You can also use the client to connect over a network or the internet by putting the correct IP into the Socket.connect(host, int port) method.
Please feel free to expand on the server and client programs! Some things you might want to consider adding are user names, private messaging different users, file sharing, and multiple rooms. Have fun with it! If you have any questions please leave me a comment below.
comments powered by Disqus