Blog
A random collection of thoughts on a variety of topics
In Part 1 of using Zenity we covered some pretty cool GUI components that can be used from a shell script. This time we will be finishing up with some examples of how to integrate some more complex gtk+ widgets into your script.
One of the most fundamental outputs any long running script should produce is some form of progress. Everyone loves a well tuned, accurate progress bar! Conversely, everyone hates a progress bar that goes to 99% immediately and sits there for 10 minutes. Getting a progress bar perfect is an art in and of itself, but that’s not really the point of this tutorial. I’m just going to show you how a Zenity progress bar works.
The Zenity progress bar is activated through the --progress flag. The progress bar is different from the other components because it actively listens on standard in for progress and text to display. Any text you want displayed above the progress bar must begin with a ’#’ character. Any number that is written to standard out is assumed to be the progress. As you can see in the example below, before I copy a file, I echo the file name with a ’#’ character before it. Then I perform the copy operation, and update the percentage. The output of the entire for loop is piped to the progress bar.
#! /usr/bin/env bash

##
# This script will copy all of the specified files to the destination
# usage ./copy.sh file1 file2 ... fileN destination/
#

numberOfArgs=$#

if [ $numberOfArgs -le 0 ]; then
    echo "Usage: ./copy.sh file1 file2 ... fileN destination/" >&2
    exit 1
elif [ $numberOfArgs -le 1 ]; then
    echo "You must specify a destination" >&2
    exit 1
fi

destination=${@: -1}

for (( i=1; i<$numberOfArgs; i++ )); do
    echo "# ${1}"
    cp "${1}" "$destination"
    echo "$(( (i * 100) /numberOfArgs ))"
    sleep 0.5  #So that you can see the items being copied
    shift 1
done | zenity --progress --title="Copy files to $destination" --percentage=0

if [ "$?" -eq 1 ]; then
    zenity --error --text="Copy Aborted"
    exit 1
fi
If you are unsure how long an operation will take, but want to display text on a progress bar you can use the --pulsate option. The pulsate option will just move a bar back and forth until end-of-file is read from standard in. To see it’s effect on your distribution run this simple command. (on Unity it just sits empty. How boring!)
$ ( sleep 5; echo "# done" ) | zenity --progress --pulsate \
   --title="Long operation" --text="Doing lots of stuff"
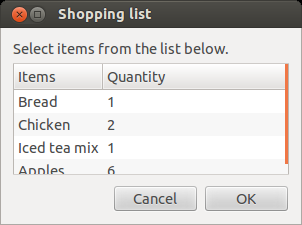
Another more advanced GUI widget that Zenity has to offer is the list dialog. The list dialog is activated by the --list flag and has quite a few options to control it’s behavior. To specify the names of the columns you can use the --column="name" flag as many times as you need. Each flag will add another column to the list display. Once you have all of the columns set up you can start adding content. To do this just add space separated values.
$ zenity --list --title="Shopping list" --column="Items" --column="Quantity" \
   "Bread" 1 \
   "Chicken" 2 \
   "Iced tea mix" 1 \
   "Apples" 6
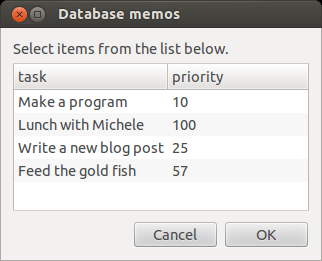
Lists are great for displaying two dimensional data, like a database table. In this example I will read the data from a sqlite3 database called test.db that has a single table called memos. I then use Zenity to display the data in a nice tabular form.
#! /usr/bin/env bash
#Read from a sqlite3 database and build a zenity list
#to represent the table

command='--list --title="Database memos" '
header=`sqlite -header -list test.db 'select * from memos;' | head -n 1`

IFS='|' read -a columns <<< "$header"

for col in ${columns[@]}; do
   command="$command --column=\"$col\" "
done

command="$command $(sqlite -csv test.db 'select * from memos;' | tr ',' ' ') "

echo "$command" | tr '\n' ' ' | xargs zenity
Each row in the table can also be made editable with the --editable flag. By doing this, the changed rows are sent back to standard out when the okay button is pressed. Although this may seem like a great feature, it is harder to work with in practice. Zenity only prints the fist column of the changed row by default after you hit okay. This can make it hard for a script to know what was actually edited. In order to figure out which row is being edited I suggest using some sort of key in the first column, and to use the --print-column=ALL flag to get the entire row. However if the user edits the key column of a row, you’re going to have a bad time!
The final Zenity widget I am going to cover is the scale slider. Scale sliders are great for getting a numeric value from an arbitrary range of values. The scale can be used with the --scale flag. You can set the initial value, minimum value, maximum value, and step size with the --value, --min-value, --max-value, and --step respectively. The default values for each of those flags respectively are 0, 0, 100, and 1. You can also enable the scale to output the value to standard out on every change instead of just the final value using the --print-partial flag.
$ zenity --scale --min-value=0 --max-value=255 --text="Please select red saturation"
This completes our tour of Zenity. As you can see Zenity provides a great utility for making bash scripts more approachable to users who might not be aware of, or comfortable with using the command line. Feel free to try, or modify any of the examples I have given and build a nice GUI application with a bash script.
comments powered by Disqus