Blog
A random collection of thoughts on a variety of topics
“Secure Sockets and Servers with Dart 1.0”
2013-12-14
My last post on Socket Programming with Dart was a huge hit and I got some requests to follow it up with a websockets version. I am more then happy to oblige, but before I can dive into websockets and the Dart HTTP API stack, I want to first show how to set up and use secure sockets. Why cover secure sockets? Well if we are going to write a web facing chat server I think those messages should be encrypted.
Dart secure sockets and secure servers use SSL/TSL security. More specifically they rely on X.509 certificates to validate servers and (optionally) clients. The server will hand out a certificate that will verify itself to the client. If the client accepts the certificate it will exchange symmetric session keys used to encrypt the communications between them. In a production environment the X.509 certificate is signed and verified by a 3rd party called a certificate authority. Web browsers usually have a list of trusted authorities that they will accept signatures from.
In our development environment, we are going to create self signed certificates for our secure severs. Does self signed mean insecure? No, the data will still be encrypted as one would expect, but our clients will get a warning that we are not recognized as a valid signing authority. In fact it’s funny looking around the web at how many large we companies are trusted as valid authorities, and self sign their certificates. Google is a good example of this, check out https://google.com and you will see the certificate is verified by Google Inc.
The Dart implementation of SSL/TSL security uses a Network Security Services (NSS) database to store the server private key and certificate in. Before we begin programming and using secure sockets with Dart we must first set up the database.
Setting up an NSS Key Database
Network Security Services or NSS is a set of libraries and tools to create secure server and client applications. It is provided by the Mozilla Foundation and is used in many of their products. To start setting up the database, you must first install the NSS tools. On Ubuntu it’s simply sudo apt-get install libnss3-tools. On Fedora 17 you can use sudo yum install nss-tools. On OSX you can use brew install nss . For more specific installion instructions you can check out The Mozilla wiki (look at part 3).
Once you have the tools installed, you can use the command line application called certutil to create a new key database, and create a self signed development certificate. To create the database, use the commands
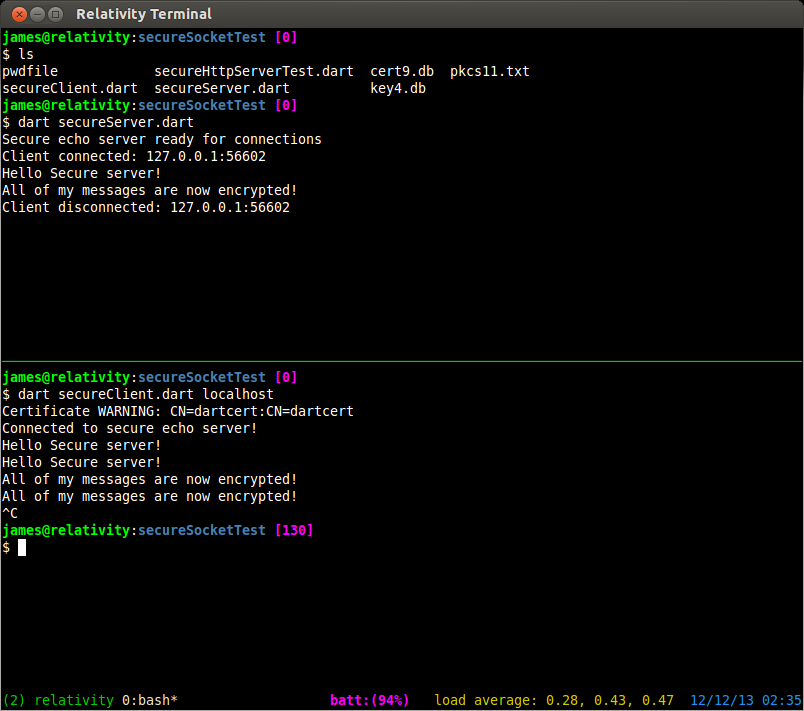
$ echo "[my secret password]" > pwdfile
$ certutil -N -d 'sql:./' -f pwdfile

$ ls
pwdfile  cert9.db  key4.db  pkcs11.txt
Let’s break down this command. The -N flag says to create a new database. The -d 'sql:./' flag says to create a new cert9.db and key4.db file in the current directory. The “sql:” prefix is necessary to indicate that you want the newer format. If you forget the “sql:” prefix then you will get the old cert8.db and key3.db files, which are not compatible with Dart! The -f pwdfile flag says to use the file ‘pwdfile’ as a password file. Before you create the database, you should echo a password into a password file to use for the rest of the commands.
Okay, so now we have an empty key database. Let’s create a self signed certificate so we can start developing our application. In a production environment we would create a certificate request, then send the request to some certificate authority to have a certificate issues. Once the certificate is issued we would load it into the NSS database. However that is more work (and cost) than is needed for a simple development project. Creating a self signed certificate will still let us experiment, but will throw a warning to our connecting clients (like web browsers).
$ certutil -S -s "cn=dartcert" -n "self signed for dart" -x -t "C,C,C" \
  -m 1000 -v 120 -d "sql:./" -k rsa -g 2048 -f pwdfile


  A random seed must be generated that will be used in the
  creation of your key.  One of the easiest ways to create a
  random seed is to use the timing of keystrokes on a keyboard.

  To begin, type keys on the keyboard until this progress meter
  is full.  DO NOT USE THE AUTOREPEAT FUNCTION ON YOUR KEYBOARD!


  Continue typing until the progress meter is full:

  [**********                                          ]
There are a ton of flags in that last command, lets break them down. The -S flag makes a certificate and adds it to the database. The -s "cn=dartcert" flag specifies the subject line, and sets the common name to “dartcert”. -n "self signed for dart" sets the nickname of the certificate. -x tells it to self sign, and -t "C,C,C" sets the certificates trust attributes. In our case we are setting all three of attributes to “trusted CA to issue server certs.” The -v 120 flag makes the certificate valid for 120 months. Finally the -k rsa -g 2048 flags tell certutil to use an RSA algorithm with a 2048 bit key. Feel free to use a stronger key, up to 8192 bits.
After you run the command, you will be prompted to mash the keyboard to generate some entropy to seed the algorithm. Now your certificate is ready for use. You can view the certificates in the database with the command certutil -L -d 'sql:./'. Keep in mind that this is the bare minimum you need to create a self signed certificate. For more options you can use the command certutil -H, or check out some examples at the Mozilla Foundation NSS page.
Creating a Secure Server
Alright! Now that we have our database set up and a certificate that we can use lets get to some coding. To get stated we are going to work with the SecureServerSocket and SecureSocket classes.
import 'dart:io';

void main() {
  String password = new File('pwdfile').readAsStringSync().trim();
  SecureSocket.initialize(database: "./",
                          password: password);

  SecureServerSocket.bind(InternetAddress.ANY_IP_V4, 4777, "CN=dartcert")
    .then((SecureServerSocket ss) {
      print("Secure echo server ready for connections");

      ss.listen((SecureSocket sClient) {
        print("Client connected: "
          "${sClient.remoteAddress.address}:${sClient.remotePort}");
        sClient.write("Connected to secure echo server!");

        sClient.listen((List data) {
          String message = new String.fromCharCodes(data).trim();
          print(message);
          sClient.write(message);
        },
        onDone: () {
          print("Client disconnected: "
            "${sClient.remoteAddress.address}:${sClient.remotePort}");
          sClient.destroy();
        });
      },
      onError : (error){
        print(error);
      });
    });
}
The first thing that needed to be done was get connected to the NSS database. since I have stored the password to the database in a file, I will simply read the password from that file in my server program. To do that I use File.readAsStringSync(). The “Sync” tells dart to make a blocking read on that file, and prevent the rest of the program from running until it’s complete. To open up the database I use SecureSocket.initialize() to tell Dart where to find it, and the password to use to get in. To create a secure server socket I use SecureServerSocket.bind() and pass it three parameters. The first is what interface to listen on. Just like last time I want to listen on all of them. The second is what port to bind to. Any port above 1024 is okay to use (as long as some other program hasn’t bound to it first). The third parameter tells Dart what certificate to use to establish new secure connections. The name I use is exactly the same as the name I provided to certutil when I created the certificate.
From this point forward, everything should look familiar. The code is exactly the same as the regular socket code. You listen() for new connections, and handle them accordingly.
Connecting to a Secure Server
So now we have our secure server, how do we securely connect a new client? We cant just use telnet anymore because of the TSL handshake that establishes the secure connection. We need to write our own client for this server.
import 'dart:io';

void main(List<String> args) {
  if (args.length < 1){
    print("Please specify a hostname or IP");
    return;
  }

  String host = args[0];
  SecureSocket socket;
  SecureSocket.connect(host, 4777, onBadCertificate: (X509Certificate c) {
    print("Certificate WARNING: ${c.issuer}:${c.subject}");
    return true;
  }).then((SecureSocket ss) {
      socket = ss;

      socket.listen((List data) {
        String message = new String.fromCharCodes(data).trim();
        print(message);
      },
      onDone: () {
        print("Lost connection to server");
        socket.destroy();
      });
    });

  stdin.listen((List data) {
    String input = new String.fromCharCodes(data).trim();
    socket.write(input);
  });
}
This should also look pretty familiar for the most part. The only real difference between this program, and one that uses regular sockets is the onBadCertificate callback. To connect to the server we simply use SecureSocket.connect() and pass it a host or IP address, and a port number. The onBadCertificate callback must return a bool that indicates whether to accept or reject a “bad” certificate. Our self signed certificate will trigger this callback, so we need to return true in order to use this client with our current certificate. If you happen to have a valid certificate issued from a trusted certificate authority you should not have this issue.
Creating a secure HTTP server
Creating a secure HTTP server is as easy as creating a secure socket. The only difference is that we use the HttpServer.bindSecure() method. We still specify what devices to listen on, what port to use, and the name of our certificate. We also still need to use the SecureSocket.initalize() method to tell our program where to find our certificate database.
import 'dart:io';
void main(){
String password = new File('pwdfile').readAdStringSync().trim();
SecureSocket.initialize(database: "./",
password: password);
HttpServer.bindSecure(InternetAddress.ANY_IP_V4, 4443,
certificateName: "CN=dartcert")
.then((HttpServer server) {
server.listen((HttpRequest request) {
print('Request for ${request.uri.path}');
request.response.write(
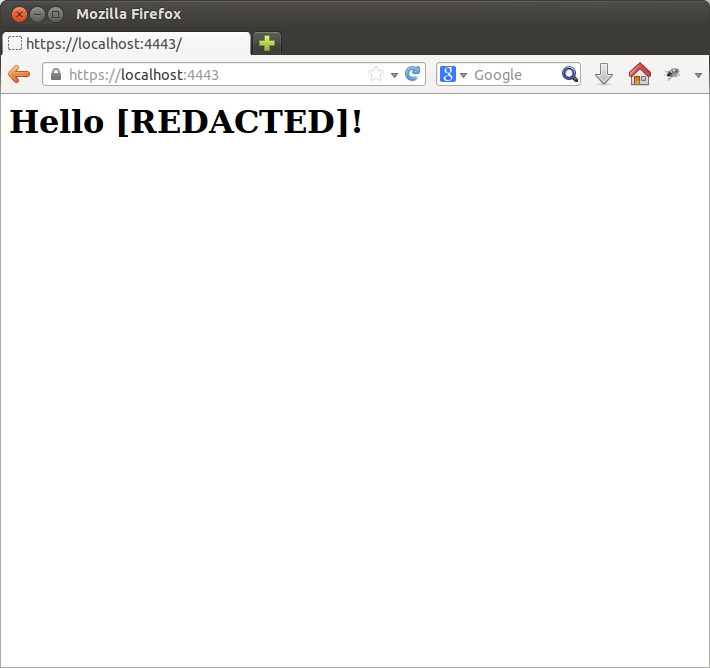
"<html><body><h1>"
"Hello [REDACTED]!"
"<//h1><//body><//html>");
request.response.close();
});
});
}
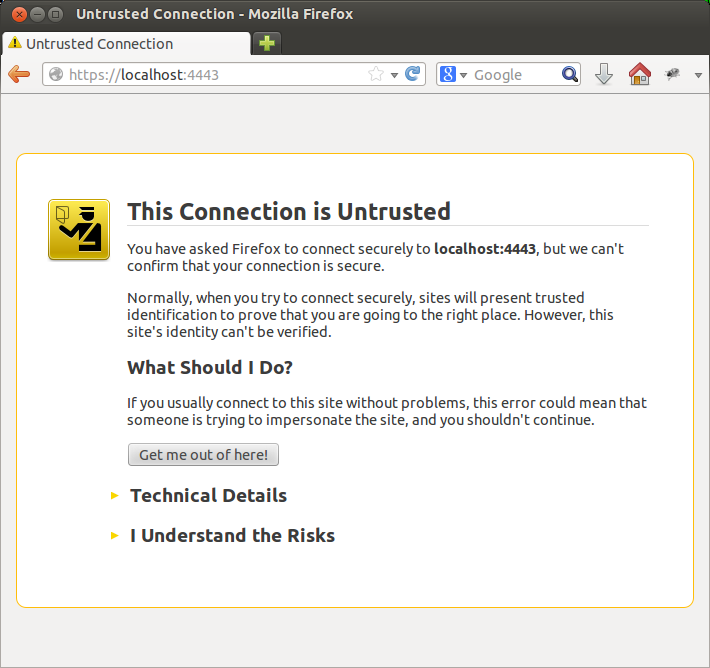
Now you can fire up an instance with dart secureHttpServer.dart and point your browser to http://localhost:4443. You can add an exception for your self signed certificate. Normally I would NEVER advocate accepting a certificate exception, but since it’s ours, and it’s localhost, there’s no risk.
$ dart secureHttpServer.dart
Request for /
Request for /favicon.ico
Request for /favicon.ico
Now that we have gotten that out of the way, next time I will present another chat server and client implemented with Dart websockets. I must admit I was pleasantly surprised by how natural and effortless it is to program in Dart on the client side! Stay tuned for the next part in the series.
comments powered by Disqus