Blog
A random collection of thoughts on a variety of topics
So far I have covered a variety of sockets that are supported by Dart. Just recently the Dart developers added the ability to use UDP sockets to the dart:io library. So for this installment I will cover how to use Dart to send and receive data over UDP. I will start with an explanation of how UDP works, then move on to specific client and server examples in Dart. I will also present UDP multicasting in Dart, and cover some gotchas that come up when trying to work with it.
What is UDP?
UDP is the User Datagram Protocol. It is different from TCP (Transmission Control Protocol) in that it does not establish a connection to the destination. UDP is designed to send datagrams. Datagrams can be though of as discrete blocks of data or messages with limited overhead. UDP does not guarantee that the datagrams will be delivered in any specific order or even at all! So you might be asking, “Why do we use them if they are not guaranteed to arrive at their destination?”. Good question! They are very useful for certain types of data that does not need 100% reliability, and therefore it does not need the overhead that TCP imposes.
So what kind of data does not need to be reliably delivered? Say you are running a server that receives weather updates from hundreds of weather stations across the country once every second. That’s a lot of data, but more importantly each new message from a single weather station makes the previous message obsolete. In this case if we loose a few messages it’s not a big deal.
Other kinds of services that are transmitted over UDP are streaming video, voice over IP phone calls, DHCP, and multi-player online games.
Close look at a UDP Datagram
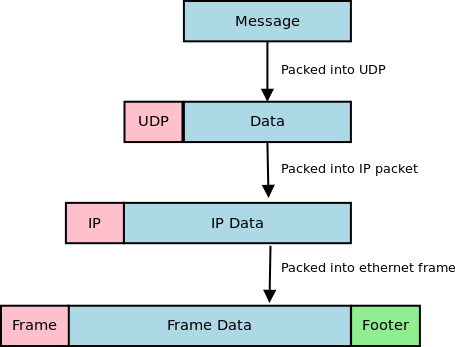
A user datagram has a fixed 8 byte header. The header is very simple and contains four, 16 bit fields. The fields are the source port, destination port, total length, and a checksum. Let’s take a look at it as a C struct.
#include <stdint.h>

typedef struct {
   uint16_t sourcePort;
   uint16_t destPort;
   uint16_t length;
   uint16_t checksum;
} UDPHeader_t;
Now you can see how simple the UDP header really is. There is not much too it. Before the datagram is sent out it is first encapsulated into an IP packet. The IP packet has its protocol field set to 17 (0x11) to indicate that it is carrying a UDP packet. The IP header contains the source and destination addresses. The structure of an IPv4 IP header can be found here at Wikipedia.
Finally this IP packet will be encapsulated into an Ethernet frame. Since most routing equipment uses a 1500 byte MTU (Maximum transmission unit), a data payload that is sent using UDP should be kept at or below 1432 bytes (IP headers can be up to 60 bytes, and the UDP header is always 8 bytes).
On a side note, if your interested in more details about TCP/IP and the protocols that keep networks and the internet running, I recommend you check out TCP/IP Protocol Suite by Behrouz A. Forouzan. It contains a lot of detailed information about a ton of different protocols.
UDP Receiver (client) Example
Alright, now that we know how UDP works, let’s check out how to set up a UDP client to start receiving UDP packets. To get started we are going to use the RawDatagramSocket class in dart:io. One thing that should jump out at you as we go through these examples is that it doesn’t matter whether you are sending or receiving datagrams, you must still bind the socket. This is because datagram sockets are connectionless. Every sender is also a receiver by default and can receive messages. All of the below examples are tested against Dart 1.1.3.
import 'dart:io';

void main(List<String> args){
  RawDatagramSocket.bind(InternetAddress.ANY_IP_V4, 4444).then((RawDatagramSocket socket){
    print('Datagram socket ready to receive');
    print('${socket.address.address}:${socket.port}');
    socket.listen((RawSocketEvent e){
      Datagram d = socket.receive();
      if (d == null) return;

      String message = new String.fromCharCodes(d.data).trim();
      print('Datagram from ${d.address.address}:${d.port}: ${message}');
    });
  });
}
We start out by calling the RawDatagramSocket.bind() method to bind the socket to port 4444 on any available IPv4 Ethernet devices. This returns a Future<RawDatagramSocket>. Once the socket has been bound we can listen for any incoming datagram packets by registering an onData callback using the RawDatagramSocket.listen() method. One thing to note is that the onData callback gives us a RawSocketEvent object. To receive the actual datagram we must call RawDatagramSocket.receive() inside of the onData callback. The receive method will return null if there are no datagrams available so make sure you check for that state. The Datagram object returned by the receive() method contains the InternetAddress object with the details of the sender, and the data that was sent as a List<int>.
To test this application fire it up with Dart, and use netcat to send it some test packets.
## in terminal 1
$ dart udp_receive.dart
Datagram socket ready to receive
0.0.0.0:4444
Datagram from 127.0.0.1:42811: Hello!
Datagram from 127.0.0.1:42811: How are you doing?
Datagram from 127.0.0.1:42811: This is receiving UDP packets!

## in terminal 2
$ nc localhost 4444 -u
Hello!
How are you doing?
This is receiving UDP packets!
UDP Sender (server) Example
To create a program that sends datagrams, we basically do the same thing as before. We need to bind() the socket, then call the RawDatagramSocket.send(List<int> buffer, InternetAddress address, int port) method. The send method does not take a Datagram object like you might expect, instead the send() method takes the destination address and port directly. The address and port parameters tell the datagram where to go. Remember that this is a connectionless protocol so each time we want to send data we need to provide a destination.
import 'dart:io';

void main(List<String> args){
  RawDatagramSocket.bind(InternetAddress.ANY_IP_V4, 0).then((RawDatagramSocket socket){
    print('Sending from ${socket.address.address}:${socket.port}');
    int port = 4444;
    socket.send('Hello from UDP land!\n'.codeUnits,
      InternetAddress.LOOPBACK_IP_V4, port);
  });
}
Notice that the bind() method call takes 0 as the port number. This tells Dart that we don’t care what port we use to send the datagram, just pick the next one that is available. Also take note that I am setting the destination to InternetAddress.LOOPBACK_IP_V4. This causes the datagram to be sent to localhost. To test this out we can fire up the udp_receive.dart program from before and then run this program.
## Terminal 1
$ dart udp_receive.dart
Datagram socket read to receive
0.0.0.0:4444
Datagram from 127.0.0.1:33083: Hello from UDP land!

## Terminal 2
$ dart udp_send.dart
Sending from 0.0.0.0:33083
UDP can send and receive together
Since UDP is a connectionless protocol, a single UDP socket can be used to send and receive data. The bind() call establishes what port and address we can receive data on, and the send() call allows us to send data to anywhere we want. We can easily make a UDP echo server by combining the two.
import 'dart:io';

void main(List<String> args){
  RawDatagramSocket.bind(InternetAddress.ANY_IP_V4, 4444).then((RawDatagramSocket socket){
    print('UDP Echo ready to receive');
    print('${socket.address.address}:${socket.port}');
    socket.listen((RawSocketEvent e){
      Datagram d = socket.receive();
      if (d == null) return;

      String message = new String.fromCharCodes(d.data);
      print('Datagram from ${d.address.address}:${d.port}: ${message.trim()}');

      socket.send(message.codeUnits, d.address, d.port);
    });
  });
}
In the above example, each time a Datagram is received, it is echoed back to the sender. The Datagram object carries the source InternetAddress, and source port that we can use in the send() method to return the message.
## Terminal 1
$ dart udp_echo.dart
UDP Echo ready to receive
0.0.0.0:4444
Datagram from 127.0.0.1:57194: Now are are getting an echo
Datagram from 127.0.0.1:57194: much more interesting!

## Terminal 2
$ netcat 127.0.0.1 4444 -u
Now are are getting an echo
Now are are getting an echo
much more interesting!
much more interesting!
Multicast
These Dart programs presented above all perform unicasting. Unicasting is a one-to-one transmission of data. There is a single source and a single destination. However using UDP sockets, we can also take advantage of multicasting. Multicasting opens us up to have a single source and multiple destinations. This is very convenient for certain applications like streaming media. The source program send datagram packets to a multicast group address. Each interested client then joins the multicast group and can receive the datagrams being sent.
The source that is sending the multicast datagrams has an easy time, all that is necessary is to send the packets to a multicast group address instead of a normal destination address. Multicast addresses are in the range of 224.0.0.0/4. That is all IP address from 224.0.0.0 to 239.255.255.255.
/*
Multicast UDP broadcaster
multicast_send.dart
*/
import 'dart:io';
import 'dart:async';
import 'dart:math';
void main(List<String> args){
InternetAddress multicastAddress = new InternetAddress('239.10.10.100');
int multicastPort = 4545;
Random rng = new Random();
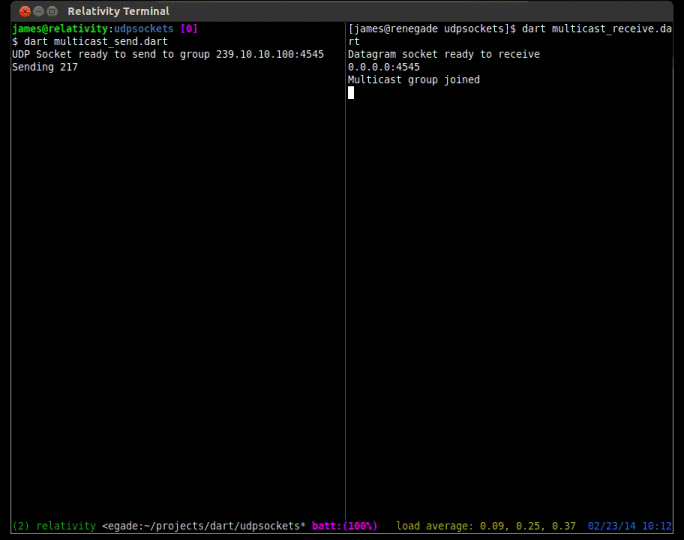
RawDatagramSocket.bind(InternetAddress.ANY_IP_V4, 0).then((RawDatagramSocket s) {
print("UDP Socket ready to send to group "
"${multicastAddress.address}:${multicastPort}");
new Timer.periodic(new Duration(seconds: 1), (Timer t) {
//Send a random number out every second
String msg = '${rng.nextInt(1000)}';
stdout.write("Sending $msg \r");
s.send('$msg\n'.codeUnits, multicastAddress, multicastPort);
});
});
}
To receive multicast content, extra steps must be taken to join the multicast group that you want to receive packets from. To join a multicast group you must issue an IGMP join command. To do this in Dart, you can use the RawDatagramSocket.joinMulticast(InternetAddress group, {NetworkInterface interface}) method. Another step that must be taken is to add a multicast route to your local routing table. Most people forget this step and can’t figure out why they are not receiving any packets. On Linux (Fedora and Ubuntu) you can add the appropriate route with the command sudo route add -net 224.0.0.0/4 dev eth0. Of course you should replace eth0 with whatever your device is actually called (on my fedora install my primary nic device is p34p1).
/*
   Multicast UDP client
   multicast_receive.dart
*/
import 'dart:io';

void main(List args){
  InternetAddress multicastAddress = new InternetAddress("239.10.10.100");
  int multicastPort = 4545;
  RawDatagramSocket.bind(InternetAddress.ANY_IP_V4, multicastPort)
    .then((RawDatagramSocket socket){
       print('Datagram socket ready to receive');
       print('${socket.address.address}:${socket.port}');

       socket.joinMulticast(multicastAddress);
       print('Multicast group joined');

       socket.listen((RawSocketEvent e){
         Datagram d = socket.receive();
         if (d == null) return;

         String message = new String.fromCharCodes(d.data).trim();
         print('Datagram from ${d.address.address}:${d.port}: ${message}');
       });
  });
}
Trouble shooting multicast
Multicast has a lot of moving parts. If you are trying to run these examples and are unfamiliar with using multicast it can be frustrating to get things functional. The first thing you should check is that you are transmitting the multicast packets from the network card you intended. If you only have one network card then you can skip this step, but if you have more then one card you can add the route to the routing table so that all traffic is sent from the correct card.
On the receiving side, you will first want to make sure your firewall is not blocking multicast traffic. Fedora Linux ships with a firewall that blocks this traffic, so if you are using Fedora and are familiar with iptables you can either add the correct rule to allow the traffic, or just run sudo iptables -F to flush the firewall rules and let all traffic through.
Next you will want to make sure you have the multicast route correctly set up. On Linux you can use the command route -n to view your routing table. It should look like the one below.
$ route -n
Kernel IP routing table
Destination     Gateway         Genmask         Flags Metric Ref    Use Iface
0.0.0.0         192.168.1.1     0.0.0.0         UG    0      0        0 eth0
169.254.0.0     0.0.0.0         255.255.0.0     U     1000   0        0 eth0
192.168.1.0     0.0.0.0         255.255.255.0   U     1      0        0 eth0
224.0.0.0       0.0.0.0         240.0.0.0       U     0      0        0 eth0
If you don’t have a line in your routing table like the last line on the example above you can add it with the command sudo route add -net 224.0.0.0/4 dev eth0. This route is necessary to properly receive multicast traffic through the specified device.
Next you will want to check if the OS has issued the IGMP join for the group address. To do this on Linux you can run cat /proc/net/igmp and you will see output like the one shown below. Make sure you are actively running the multicast_receive.dart program first.
$ cat /proc/net/igmp
Idx	Device    : Count Querier	Group    Users Timer	Reporter
1	lo        :     1      V3
				        010000E0     1 0:00000000	0
2	eth0      :     2      V3
                                        640A0AEF     1 0:00000000    	0
                                        FB0000E0     1 0:00000000    	0
                                        010000E0     1 0:00000000    	0
In the second column you will see the device names of your network cards. You will want to find the rows under the card you have set your multicast route on. Under it you will see a column called “Group” which contains 8 characters. These characters are hex numbers (4 octets). In the first group of the above example, if you take each pair of 2 hex digits you get 64 0A 0A EF. If you convert those to decimal you will see the numbers are 100 10 10 239, which is our multicast group address in reverse order. If you see a line like this then you know the OS has issued the join for the group.
Finally you will want to make sure that your router can handle multicast traffic and that it is properly configured. More advanced routers have a feature called IGMP snooping, where they can intelligently route multicast packets only to those computers interested in receiving such traffic. Other, simpler routers simply forward the multicast packets to every destination. I am using a Linksys router with dd-wrt firmware installed and have no problem with multicast. I am sure your routers can also handle the traffic unless it is very old or mis-configured.
Multicast and the Internet
I should also make you aware that you can’t send multicast traffic over the public internet. All multicast packets are dropped by ISP routers. Supposedly Internet 2 does allow multicasting, but it is still in its very early stages and mostly deployed at universities. So multicast is really only good for broadcasting inside private networks. Keep that in mind before designing any software that relies on a multicast solution.
Wrapping up the Dart socket tour
Well I hope you have enjoyed this multi-part tour of socket programming with Dart. We have covered all of the sockets that are supported by the language. If you have missed any installments you can check out TCP/IP socket programming here, Websocket programming here, and Secure socket programming here. On the next installment of the Dart socket series I will cover some miscellaneous functionality that can be used to support sockets, and make more robust socket based programs. If you have any questions or feed back about the code above, feel free to leave a comment.
comments powered by Disqus